Friday, June 30, 2006

adzuki bean ice cream


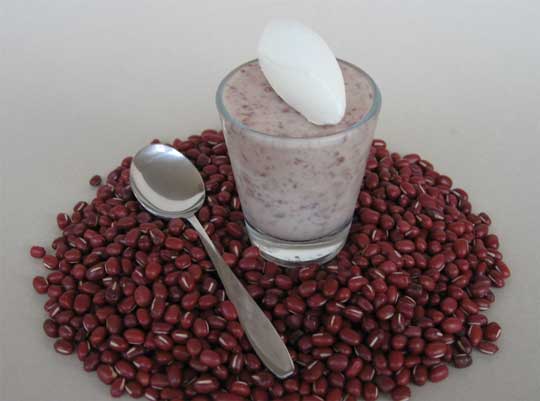
adzuki bean ice cream with whipped cream


The adzuki, or red, bean is small and reddish-brown and has a nutty-sweet flavour. It probably originated in China and is currently primarily imported from China and Thailand, where the bean is harvested in November and December. In Asia, adzuki beans are usually cooked to a soft consistency. They are served with coconut milk or cooked with rice, their bright colour tinting the rice an attractive pink. It is also common to find adzuki beans sweetened with sugar and made into cakes and sweetmeats.

Adzuki beans are used in many Asian desserts. Although I have eaten adzuki bean ice cream, I have never made it myself, until recently that is. For my first attempt, I used store bought sweetened red bean paste. The result was an ice cream that had flavour but lacked texture. I think that the texture of bean is what makes red bean ice cream special. It is the combination of red bean texture and sweet nutty flavour that is comforting.

My second attempt involved making sweetened adzuki beans. I then added a cup of the sweet beans to my ice cream base. Unfortunately, the colour and flavour were weak, and there was now too much texture. During my third and final attempt, I added two cups of sweetened adzuki bean to the ice cream base and blended the mixture in a food processor. This technique created an adzuki bean ice cream with colour, taste and just enough texture. I served the ice cream with whipped cream, which compliments its flavour and texture. I highly recommend that you try adzuki bean ice cream.


sweet adzuki beans


1 cup dried adzuki beans (red bean)
1 cup sugar
pinch of salt

1. Place beans in a bowl of water and soak overnight.
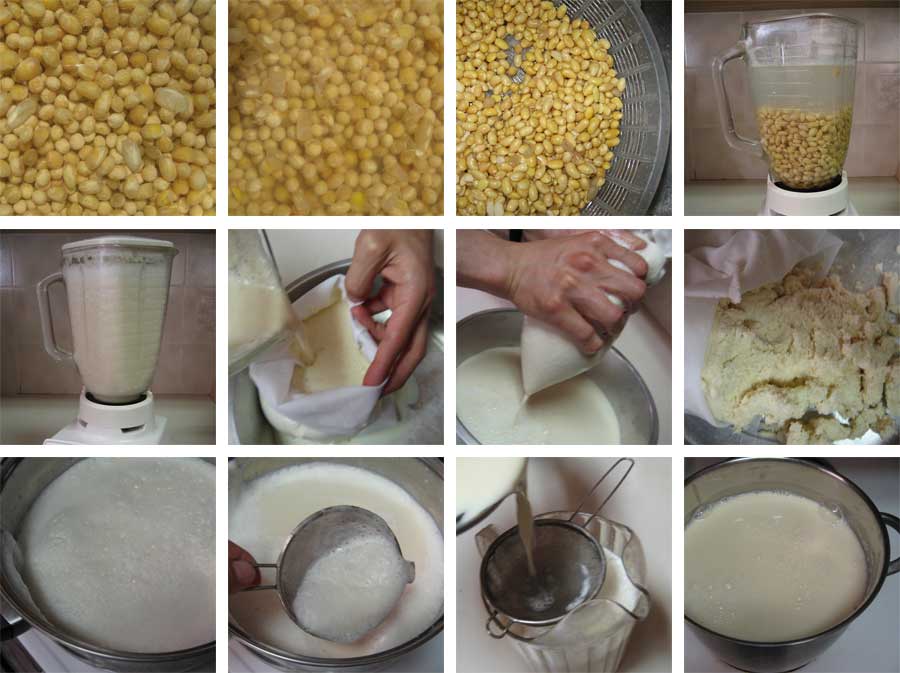
2. Drain beans and rinse well. Put the beans in a saucepan and add water to cover. Bring to a boil and drain. Return to the saucepan and add water to cover the beans by 1 cm. Bring to a boil and simmer, skimming any scum from the surface. Continue to simmer until beans are soft, about 30 minutes.
3. Add sugar, stirring to dissolve. Then bring to a boil. Reduce heat to low and simmer covered, stirring frequently, until beans thicken, at least another 30 minutes. It is very important to stir beans frequently as sugar can cause mixture to stick to the bottom of the pan. Remove from heat, add pinch of salt and stir well. Let cool.

Makes approximately 2 1/2 cups.


adzuki bean (red bean) ice cream


1 cup heavy cream
1 cup whole milk
2/3 cup sugar
5 egg yolks
2 cups of cooked sweet adzuki beans

1. Place heavy cream, whole milk and 1/3 cup of sugar in a small saucepan. Bring to a rolling boil over medium-high heat, stirring occasionally.
2. In a small bowl, whisk the remaining 1/3 cup of sugar with the egg yolks until well mixed. Temper the egg yolk mixture with 1/2 cup of the hot cream mixture.
3. Once tempered, add the rest of the egg mixture into the cream mixture and bring mixture up to 85ºC or until it coats the back of a wooden spoon.
4. Let the mixture cool and then add the 2 cups of adzuki beans. Let the mixture sit in the refrigerator over night or until completely cool, at least four hours.
5. Blend the adzuki bean ice cream mixture in a blender or food processor. Once processed, the adzuki bean ice cream mixture is ready to be spun in an ice cream maker.
6. Process in an ice cream maker according to the manufacturer’s directions.

Technorati Tags: , ,

Sunday, June 25, 2006

soy minimalism


I have been preoccupied with my move over the past couple weeks; yet, I have still been thinking that I would participate in the next Sugar High Friday. As I was wandering around the blogosphere, I was surprised to find out that SHF#20 and IMBB#27 were both being hosted by Reid of Ono Kine Grindz. The theme of this joint blogging event is “The Joy of Soy: Prepare a dish using Soy.”

I have had ice cream on my mind because of my upcoming ice cream event. So, I thought I would make edamame ice cream. I bought the edamame beans but decided that I had become a little too engrained in the ice cream theme. I wanted to make something with soy that showed soy’s wonderful natural flavour. Since my mother was in town at the moment, I asked her to walk me through the steps of making soy milk and dessert tofu.

My parents have been cooks all their lives and food runs strong in my family. (For my part, I have been to pastry school and have experience working in the industry, although I currently work in another field.) My mother has been making homemade soy milk and dessert tofu for many years, but it is only now that I have gone into the kitchen with her to learn.

The process of making soy milk and dessert tofu is similar. The only difference between the recipes is the ratio of water and the addition of cornstarch and gypsum powder in the dessert tofu. The taste of fresh homemade soy milk is much better than most store bought, and homemade can be sweetened to your liking. The dessert tofu is light, smooth and delicate. It is the kind that you find in restaurants, often served with a sweet ginger syrup. I find that the soy milk and the dessert tofu bring back fond memories of my childhood, especially all the wonderful things that my mom made in the kitchen.

Fresh soy milk

2 cups dried soy bean
Sugar to taste

1. Soak 2 cups of dried soy beans in a large bowl with a lot of water. The beans need to soak overnight, or for at least 6 hours, until softened.
2. When the beans have finished soaking, drain in a large sieve or colander.
3. In a blender or food processor, add two cups of soaked beans with 3 cups of water, and blend until finely pulverized.
4. Pour the mixture through a fine sieve, cheese cloth or a fine mesh straining bag into a large bowl. Strain out as much liquid as possible.
5. Pour another 3 cups of water over the ground soy mixture, straining and incorporating as much of the soy flavoured liquid as possible.
6. Repeat steps 3 to 5 until you have no more soaked soy beans. Discard the excess soy bean pulp.
7. When you are done, remove excess foam on the soy milk with a small sieve or spoon.
8. Then pour the soy milk through a fine sieve one more time and place in a heavy bottomed pot.
9. Bring the soy milk to a boil on medium heat. The mixture should be stirred often. Pay attention, as the soy milk can boil over suddenly, or worse may burn.
9. After the soy milk has come to a boil, take it off the heat and let it cool. You can drink it hot or cold. If you like your soy milk sweetened, as I do, I recommend adding sugar while the soy milk is hot, because it will dissolve easier. For this amount of soy milk, I found that 1/2 cup of sugar worked well. However, I suggest you add sugar to your taste. Once cooled, store in the refrigerator for up to one week. Makes approximately 4 liters.

Fresh soy milk is simple, tasty and nutritious.


Dessert tofu

3 cups dried soy bean
1 1/2 tsp corn starch
1 1/2 tsp gypsum powder

1. Soak 3 cups of dried soy beans in a large bowl with a lot of water. The beans need to soak overnight, or for at least 6 hours, until softened.
2. When the beans have finished soaking, drain in a large sieve or colander.
3. In a blender or food processor, add two cups of soaked beans with 2 1/2 cups of water and blend until finely pulverized.
4. Pour the mixture through a fine sieve, cheese-cloth or a fine mesh straining bag into a large bowl. Strain out as much liquid as possible. Then pour another 1/2 cup of water over the ground soy mixture, straining and incorporating as much of the soy flavoured liquid as possible.
5. Repeat steps 3 and 4 until you have no more soaked soy beans. Discard the excess soy bean pulp.
6. Once you are done, remove the excess foam with a small sieve or spoon.
7. Then, pour the soy milk through a fine sieve one more time and place in a heavy bottomed pot.
8. Bring the soy milk to a boil on medium heat. This mixture should be stirred often. Pay attention, as the soy milk can boil over suddenly, or worse may burn.
9. In a small bowl, add 1 1/2 tsp cornstarch and 1 1/2 tsp gypsum powder to 1 Tbsp water. Place this mixture into a large casserole dish – one that has a lid.
10. Once the soy milk has come to a boil, pour it into the casserole dish. Do not stir. All you need to do is place the lid on the dish and let it cool for 30 minutes.
11. Once cooled, you can carefully spoon the tofu into bowls. Eat it warm, or put it in the refrigerator and have it as a cool refreshing dessert.
12. As I mentioned above, dessert tofu of this kind is very soft and silky. It is often served with sweet ginger syrup. Makes approximately 10 cups.


Ginger syrup

4 ounces fresh ginger
2 cups water
1/4 cup brown sugar

1. Grate ginger.
2. In a saucepan, combine ginger, water and sugar.
3. Simmer on low until sugar is dissolved.
4. Strain before serving.
11. Once cooled, you can carefully spoon the tofu into bowls. Eat it warm, or put it in the refrigerator and have it as a cool refreshing dessert.

Technorati Tags: , , , , , ,

Saturday, June 24, 2006

summer garden


This summer I am housesitting for a good friend in Vancouver. In the process, I have been adjusting to life in Vancouver and to a different kitchen. I didn’t bring my appliances, cookbooks or usual equipment, which I always keep on hand at home. In some ways, this change is a good challenge, because it compels me to be more creative: I have to work with the tools and resources that I have here.

The interior of my friend’s place is beautiful, and his garden is truly amazing. For instance, the garden’s assortment of herbs includes: lavender, sage, rosemary, tarragon, oregano, mint, cilantro, parsley, chives, thyme, lemon thyme, creeping thyme, and others I haven’t identified yet. He also has raspberry and black current bushes. There are many plants in various stages of growth that will offer tomatoes, zucchini, leafy greens and things that will surely be a pleasant surprise. My friend has also planted a beautiful assortment of flowers. In short, the garden looks fantastic, and I feel very fortunate to be staying here. Thanks so much, P.!

With such a fabulous array of herbs, berries, vegetables and flowers, I will certainly be drawing from this wonderful garden in my baking and in my posts. Cheers!